How Do I Use The AI Images/Videos App?
For teams looking to keep their screens fresh without relying on constant design work, AI-generated images and videos can be a powerful tool.
With our AI Images & Videos apps, you can quickly generate on-brand visuals and motion content directly within your digital signage CMS, helping you fill screens faster and reduce content creation time.
What You'll Need:
- A compatible digital signage player e.g. Mvix, BrightSign, etc.
- An Active Signature Plan
- Internet Connectivity
Getting Started
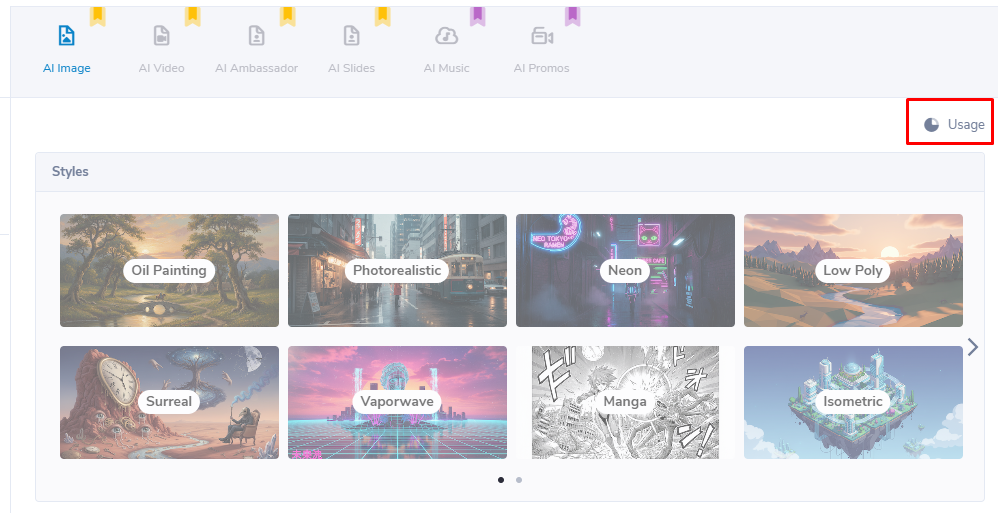
Confirm Usage
- At the top right of the AI Image & AI Video module, you'll see a button labeled "Usage".
- Click on it and you'll see you account's daily limit. Once your allotment hits zero, you will no longer be able to create new content with these apps until the next day.
AI Images
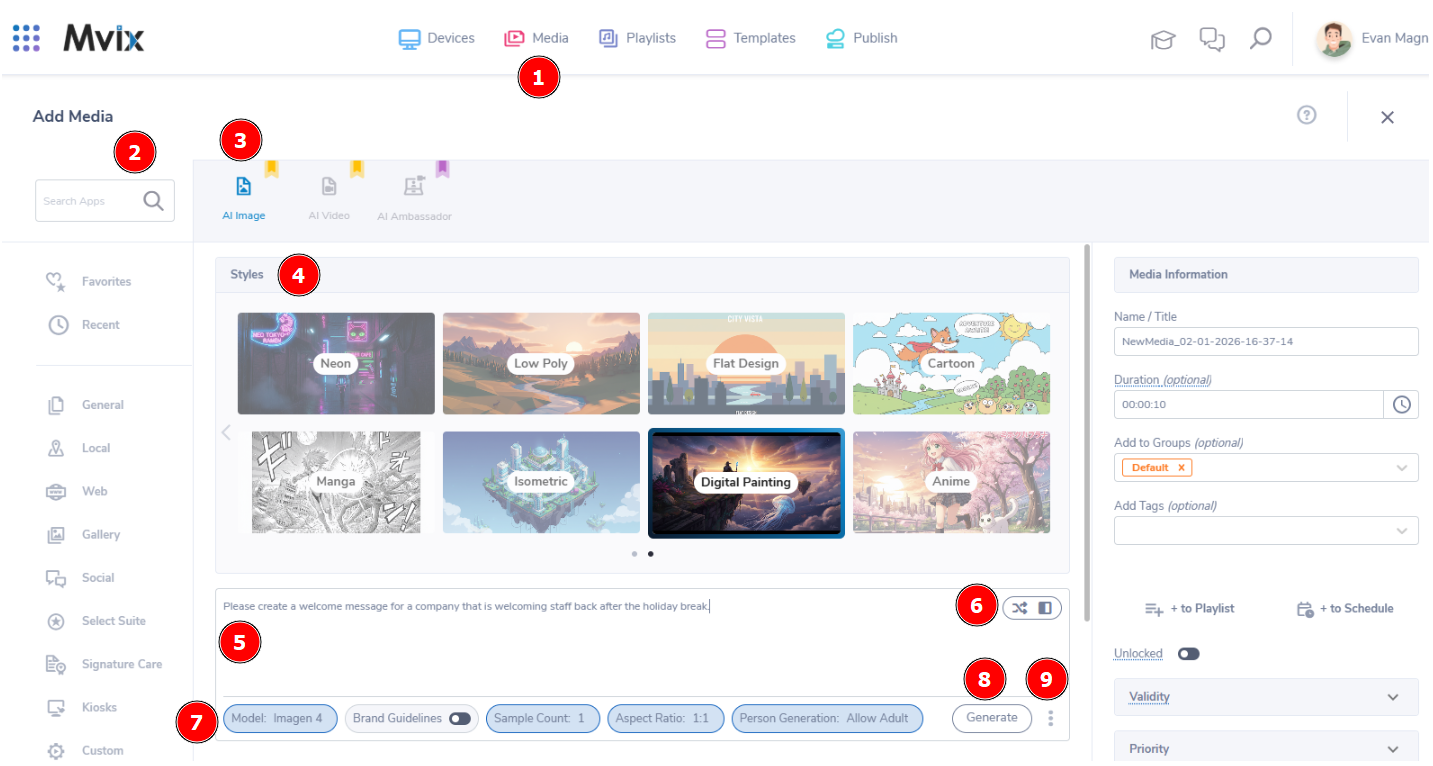
- From the Mvix CMS dashboard, (1) hover over the "Media" module and select "Add Media".
- You can then either (2) search for the app in the top-left or click on AI Toolkit category at the bottom left. Then make sure (3) you are on the AI Image content app.
- First, you'll need to choose a style. You can hover over one to get a better look and then (4) click once you've decided.
- Below it, you'll see a (5) text box. Delete the placeholder text and add in a description of the image you'd like created.
- While (6) hovering over the text box, you can click the options for randomizing the prompt or switching input mode at the top-right of the box.
- At the bottom, you'll see the (7) following options:
- Model: Choose between our available image generation AI models.
- Brand Guidelines: Toggle this option to have the image model utilize colors from your brand guidelines (found in your Account Settings).
- Sample Count: How many images that are populated per run.
- Aspect Ratio: What size the images will be outputted as.
- Person Generation: Choose whether the image will have people or not in it.
- When you're ready, (8) click "Generate" to begin the generation process. Please note that this could take up to a few minutes.
- We also offer the option to (9) load previously generated images by clicking on the three dots in the bottom-right

- Once the image loads it will appear below the text box. Hover over the image and you will have three options:
- (10) Checkbox: Select this image to toggle to add to your media library
- (11) Preview: Enlarge the image to review
- (12) Three Dots: Download this image to your computer
- Lastly, when you have your image selected, be sure to (13) name it something that's easy to reference then (14) click "Save Media" to finish adding to your media library.
AI Video
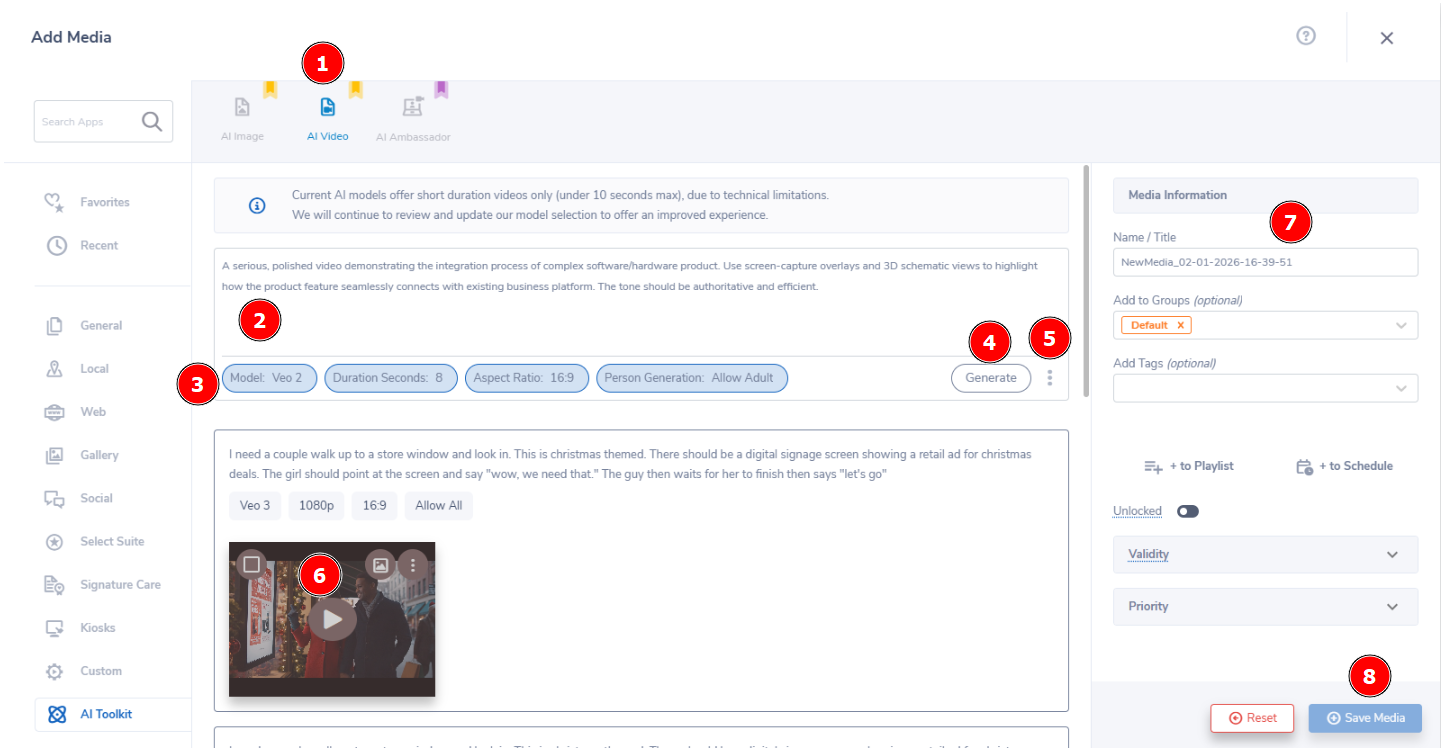
- AI Video is located right next to AI Image. (1) Click the icon to pull up this content app.
- Similar to images, be sure to be as (2) descriptive as possible for the video you want to create. However, the video will have music, sound effects, and voices so be sure to describe those if you'dlike them included.
- At the bottom will be (3) customization options. These are:
- Model: Which AI Video model to use for production
- Duration Seconds: How long you video should last
- Aspect Ratio: Set the size of your video
- Person Generation: Choose whether the video will have people in it or not
- When you are satisfied with the setup, (4) click "Generate" to begin the process. Please note this could take up to a few minutes to complete.
- You can also view previously generated videos by (5) clicking the three dots in the bottom right and selecting one of them.
- Once the video is generated, it will populate below the text box. Hover over the video for the (6) following options:
- Checkbox: Select this video to toggle to add to your media library
- Preview: Enlarge the video to review
- Three Dots: Download this video to your computer
- Lastly, be sure to (7) name your video something easy to reference, then (8) click "Save Media" to add it to your media library.