How do I Use Google Drive in Mvix CMS?
In this knowledgebase article, you will learn how to display documents in your Google Drive on your digital signage screens. Google Drive allows you to store, share and collaborate on files and folders from numerous devices. Drive integrates with the following apps located in Google, and is what you can display on your digital signage:
- Google Docs
- Google Sheets
- Google Slides
Since its introduction, Google Workplace has been a boon to companies worldwide that need to share their documents electronically. This feature allows teams to further integrate Google apps into collaboration and communication with deployment on digital signage screens. By simply entering the document URL of a public file, you can display it easily on your digital signage displays.
This option is perfect for companies that display documents, slides, or sheets that are updated frequently. With the added option of refresh customization, you can customize how often you want our content management software to check for updates on your files.
Google Drive Content App serves as the perfect solution for corporate businesses who want to increase their collaboration and overall communication. During important meetings, real-time information can be pulled and displayed on meeting room signage. Sheets displaying KPI metrics and sales information on Google Sheets can also be shared on breakroom signage for company-wide awareness and boost.
Manufacturing facilities can also experience the benefits of displaying Google Sheets on signage inside of their production floors by displaying product stock, shipment metrics, and more. What's more, supervisors can update this information in their Google sheet and this information can be updated on digital signage screens in 5 minutes.
What You’ll Need:
- A compatible digital signage player e.g. Mvix, BrightSign, etc.
- Mvix CMS Software with a supported feature package
- Internet Connectivity
- Access to the Google Drive Content App
If you meet the requirements listed above, simply follow the steps below:
Getting Started
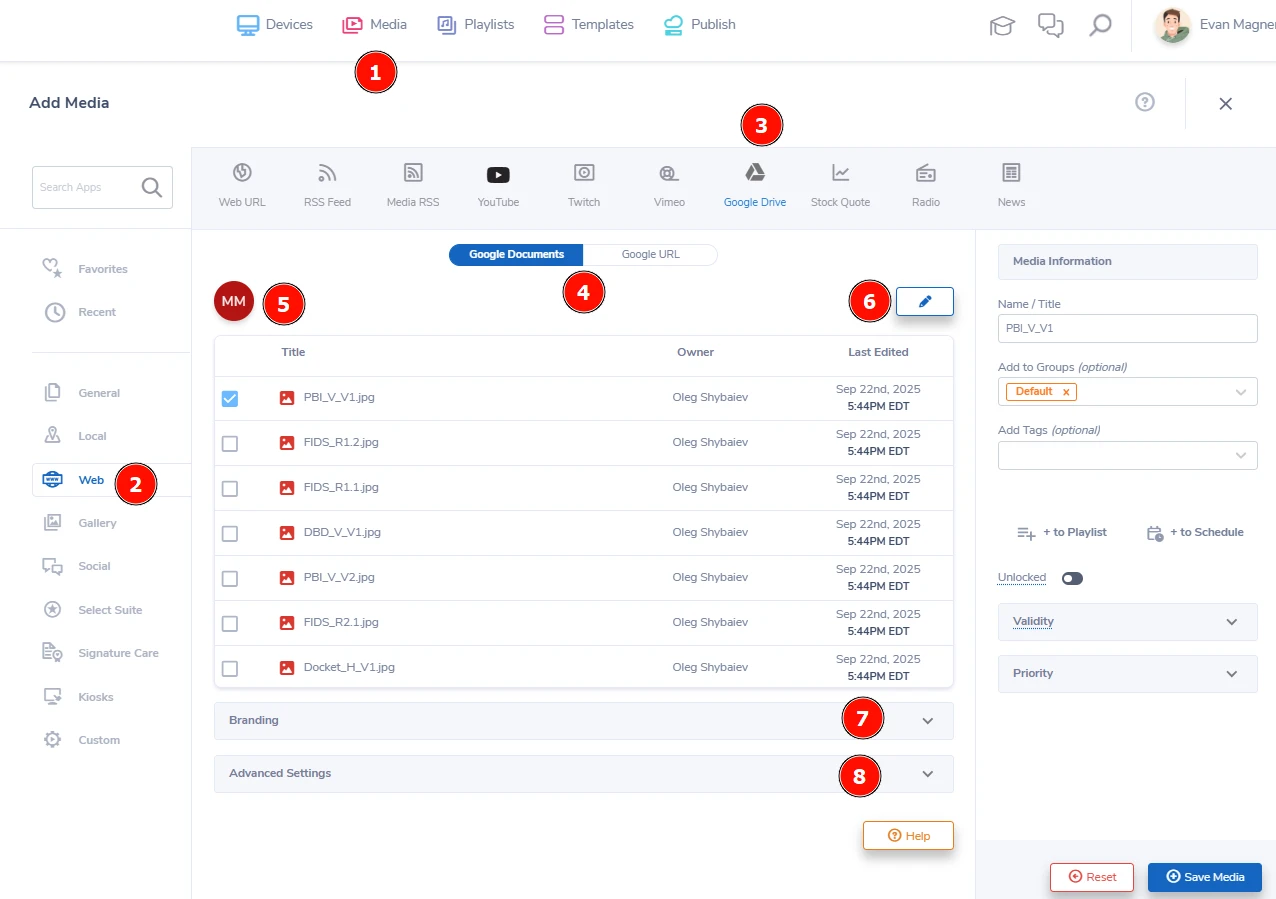
- To access the Google Drive App, access the "Add Media" section under the (1) "Media" module at the top of the CMS.
- Then, locate and (2) select the "Web" group and then (3) click "Google Drive" on the app navigation bar.
- There are (4) two options for pulling files from your Google Drive:
- Google Documents: Connect your Google account to Mvix CMS directly
- Google URL: Use a public URL to directly pull your files
Google Documents
- To start, you'll need to first connect your account. (5) Click the login box at the top-left to sign in. If you are already signed into a Google Account, your information will be pre-loaded.
- If you would like to add multiple accounts or delete any connections, (6) click on the pencil icon in the top right.
- To load your documents, click on the user you would like to pull from. This will open up a drop-down that lists all your items by last edited.
- Then, click the checkbox of all items you would like uploaded to your media library. You can hover over the icon to the left of the title to view a preview.
- Lastly, you also have the option to (7) add branding colors to the background or (8) add the toolbar to the bottom of the page.
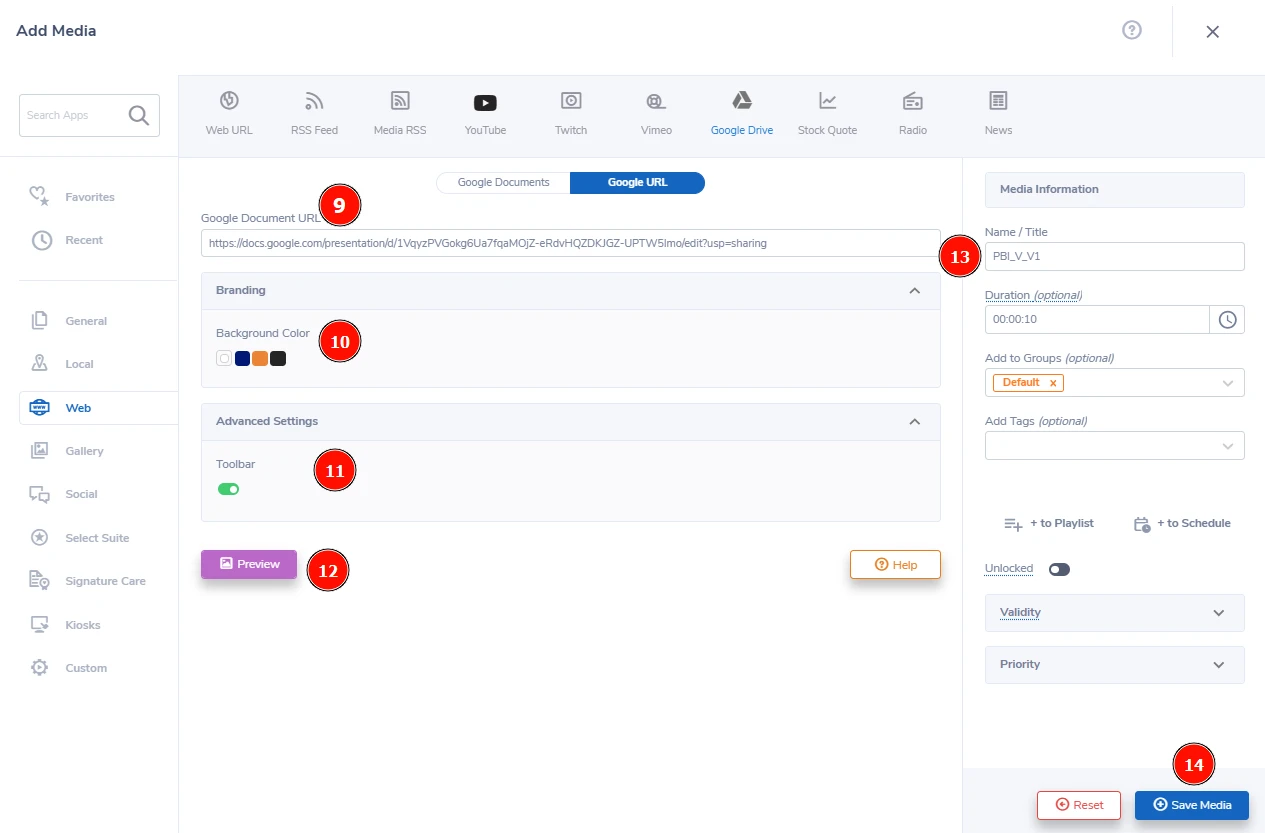
Google URL
- The second option is often a bit easier but will require your files be available via a public URL so is not recommended for sensitive files.
- NOTE: To deploy Google Drive on your digital signage, will you need to first locate the URL link for your Google Doc, Sheet, or Slide. The URL link that you need will be found when publishing your file. The file must be published for our servers to locate and display. For instructions on publishing your file, follow the instructions here.
- Copy the shared URL (the share option can be found at the top-right of the page) and (9) paste it into the field at the top
- You can apply a (10) custom background color or (11) add the toolbar to the bottom of the screen in the additional settings dropdowns.
- Then, (12) click "Preview" to see how your file will look on your screens.
Final Steps
- Once you have set up your files, (13) add a Name/Title.
- Lastly, (14) click "Save Media" to add your chosen files to the Media Library.